在上一篇文章中,我們實現“獲取相機的許可權ohos.permission.CAMERA”之後,緊接著要讓手機的螢幕開啟拍攝外部環境的畫面,其拍攝預覽的畫面也必須是後置攝像頭所拍攝的畫面。
如果你感覺開啟拍攝畫面的功能實現比較複雜,我建議你最好是參考一下HarmonyOS Developer的相關文件內容,可根據“開發->媒體->相機”目錄下的“相機開發指導”中的介面內容進行其功能的梳理。
依據上圖中的相機開發流程,華為手機的後置攝像頭想要開啟拍攝的預覽畫面,我們必須要建立相機裝置這個物件,為了更直觀更簡潔的方便你們去實現此功能,我還是按照自己的專案結構呈現相關程式碼內容。
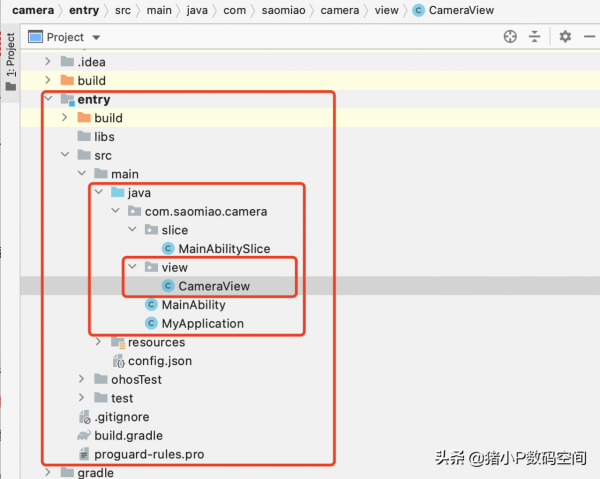
一.在專案中新建一個CameraView類繼承DirectionalLayout,單獨代表相機這個檢視物件,並實現相機裝置的建立。
專案結構圖,如下:
程式碼內容,如下:
import ohos.agp.components.ComponentContainer;
import ohos.agp.components.DirectionalLayout;
import ohos.agp.components.surfaceprovider.SurfaceProvider;
import ohos.agp.graphics.Surface;
import ohos.agp.graphics.SurfaceOps;
import ohos.agp.window.service.WindowManager;
import ohos.app.Context;
import ohos.eventhandler.EventHandler;
import ohos.eventhandler.EventRunner;
import ohos.hiviewdfx.HiLog;
import ohos.hiviewdfx.HiLogLabel;
import ohos.media.camera.CameraKit;
import ohos.media.camera.device.Camera;
import ohos.media.camera.device.CameraConfig;
import ohos.media.camera.device.CameraStateCallback;
import ohos.media.camera.device.FrameConfig;

import static ohos.media.camera.device.Camera.FrameConfigType.FRAME_CONFIG_PREVIEW;

public class CameraView extends DirectionalLayout{

    static final HiLogLabel label = new HiLogLabel(HiLog.LOG_APP, 0x00311, "MY_TAG");

    //相機裝置
    private Camera cameraSurface;

    //相機預覽模版的配置物件
    private SurfaceProvider surfaceProvider;

    //相機預覽模版
    private Surface previewSurface;

    //上下文
    private Context context;

    //攝像頭型別:前置攝像頭,後置攝像頭
    private String cameraId ;

    //執行回撥
    private EventHandler eventHandler = new EventHandler(EventRunner.current()) {
    };

    private ComponentContainer componentContainer;

    // 載入相機檢視
    public CameraView(Context context) {
        super(context);
        this.context = context;
        initSurface(context);
    }

    //第一步:初始化照相機預覽畫面的SurfaceProvider
    private void initSurface(Context context){
        WindowManager.getInstance().getTopWindow().get().setTransparent(true);
        DirectionalLayout.LayoutConfig params = new DirectionalLayout.LayoutConfig(
                ComponentContainer.LayoutConfig.MATCH_PARENT,
                ComponentContainer.LayoutConfig.MATCH_PARENT
        );
        surfaceProvider = new SurfaceProvider(context);
        surfaceProvider.setLayoutConfig(params);
        surfaceProvider.pinToZTop(false);
        surfaceProvider.getSurfaceOps().get().addCallback(new SurfaceCallBack());
        addComponent(surfaceProvider);
    }

    //第二步:建立Surface的監聽器SurfaceCallBack,正常感知SurfaceProvider的建立、改變或銷燬
    private class SurfaceCallBack implements SurfaceOps.Callback{

        @Override
        public void surfaceCreated(SurfaceOps surfaceOps) {
            //初始化相機
            initCamera();
        }

        @Override
        public void surfaceChanged(SurfaceOps surfaceOps, int i, int i1, int i2) {

        }

        @Override
        public void surfaceDestroyed(SurfaceOps surfaceOps) {

        }
    }

    //第三步:裝置建立-根據攝像頭型別建立相機裝置物件
    private void initCamera(){
        CameraKit cameraKit = CameraKit.getInstance(context);
        String[] cameraList = cameraKit.getCameraIds();
        if(cameraList.length > 1) {
            //攝像頭型別:後置攝像頭
             cameraId = cameraList[0];
        }
        CameraStateCallbackImpl cameraStateCallback = new CameraStateCallbackImpl();
        cameraKit.createCamera(cameraId, cameraStateCallback, eventHandler);
    }

    //第四步:相機回撥-透過回撥觸發並帶回Camera物件,執行相機裝置的操作
    private class CameraStateCallbackImpl extends CameraStateCallback{

        //建立相機裝置
        @Override
        public void onCreated(Camera camera) {
            previewSurface = surfaceProvider.getSurfaceOps().get().getSurface();
            if(previewSurface == null){
                return;
            }
            CameraConfig.Builder builder = camera.getCameraConfigBuilder();
            builder.addSurface(previewSurface);
            camera.configure(builder.build());
            cameraSurface = camera;
        }

        //配置相機裝置
        @Override
        public void onConfigured(Camera camera) {
            FrameConfig.Builder builder = camera.getFrameConfigBuilder(FRAME_CONFIG_PREVIEW);
            builder.addSurface(previewSurface);
            camera.triggerLoopingCapture(builder.build());
        }

        @Override
        public void onReleased(Camera camera) {
            super.onReleased(camera);
        }
    }

    //第五步:釋放相機-關閉相機相關資源
    private void releaseCamera(){
        if (cameraSurface != null){
            cameraSurface.release();
        }
    }
}
二.在MainAbilitySlice中建立相機CameraView的佈局,載入其拍攝的預覽介面。
import com.saomiao.camera.view.CameraView;
import ohos.aafwk.ability.AbilitySlice;
import ohos.aafwk.content.Intent;
import ohos.agp.components.ComponentContainer;
import ohos.agp.components.DirectionalLayout;
import ohos.agp.window.dialog.ToastDialog;
import ohos.bundle.IBundleManager;

public class MainAbilitySlice extends AbilitySlice {

    public static final int MY_PERMISSIONS_REQUEST_CAMERA = 1039;

    private CameraView cameraView;

    @Override
    public void onStart(Intent intent) {
        super.onStart(intent);
//        super.setUIContent(ResourceTable.Layout_ability_main);
        requestCameraPermission();
    }

    //1.獲取相機許可權
    public void requestCameraPermission(){
        if (verifySelfPermission("ohos.permission.CAMERA") != IBundleManager.PERMISSION_GRANTED) {
            // 應用未被授予許可權
            if (canRequestPermission("ohos.permission.CAMERA")) {
                // 是否可以申請彈框授權(首次申請或者使用者未選擇禁止且不再提示)
                requestPermissionsFromUser(
                        new String[] { "ohos.permission.CAMERA" } , MY_PERMISSIONS_REQUEST_CAMERA);
            } else {
                // 顯示應用需要許可權的理由,提示使用者進入設定授權
                new ToastDialog(getContext()).setText("請進入手機系統【設定】中,重新開啟應用的相機許可權").show();
            }
        } else {
            // 許可權已被授予
            new ToastDialog(getContext()).setText("已授權,可使用相機的拍攝功能").show();
            //成功進入相機拍攝的預覽介面
            initCameraView();
        }
    }

    private void initCameraView(){
        cameraView = new CameraView(this);
        DirectionalLayout.LayoutConfig params = new DirectionalLayout.LayoutConfig(
                ComponentContainer.LayoutConfig.MATCH_PARENT,
                ComponentContainer.LayoutConfig.MATCH_PARENT
        );
        cameraView.setLayoutConfig(params);
        super.setUIContent(cameraView);
    }

    @Override
    public void onActive() {
        super.onActive();
    }

    @Override
    public void onForeground(Intent intent) {
        super.onForeground(intent);
    }
}
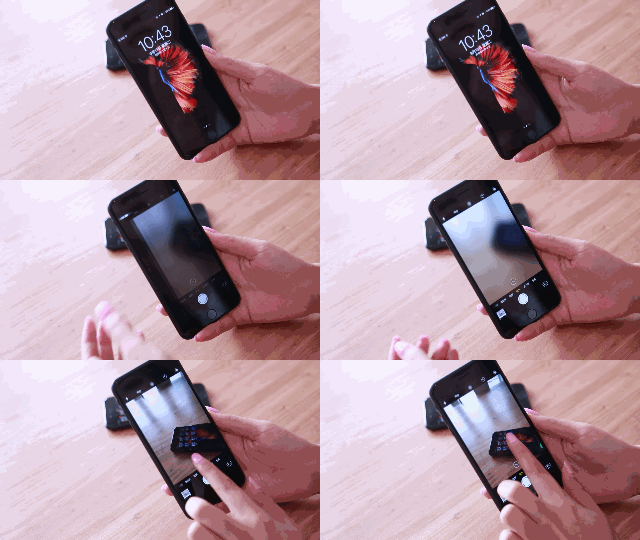
三.手機USB資料線連線電腦端,進行真機測試,開啟專案的APP檢視相機的後置攝像頭是否讓螢幕出現拍攝畫面。
如上圖所示,若專案APP的介面開啟之後,其預覽介面能正常顯示出所拍攝的事物,則表示手機後置攝像頭已經可以進行正常拍攝。
結語:
我們手機的掃碼功能-“掃一掃”,其掃碼區域的範圍仍處於手機後置攝像頭所拍攝的區域,必須要開啟手機的拍攝畫面才行。只有開啟手機的拍攝畫面,我們才能在後面透過掃描功能來捕獲拍攝畫面中的條形碼、二維碼等圖片資訊。
本篇內容,由於存在回撥函式Callback的多次使用,初學者需要參考HarmonyOS官方相應的文件才能更加熟悉。以上所有的程式碼塊我自己已經測試成功,請你們在成功獲取相機許可權之後再進行本篇程式碼內容的新增和功能測試、最佳化。


